DNSのDMARCレコードにレポートの送信先を指定しておくことで、メールの受信者側からDMARCの判定結果のレポートを受け取ることができます。
しかし、DMARCレポートは人間が見て分かりやすいようにはなっていません。
そのため、DMARCレポートを可視化するツールやサービスが数多くあります。
今回はそのうちの一つ、「dmarc-report-converter」を試してみたのでご紹介します。
dmarc-report-converterについて
dmarc-report-converterはxml形式のDMARCレポートを人間が見て分かりやすい形式に変換するツールで、無償で利用できます。
出力できるファイルは「html」「txt」「json」などですが、html形式で出力してWebサーバ上で確認できるようにするのが基本的な使い方のようです。
任意でレポートファイルを読み込ませて変換するほかに、IMAPでレポート受信用のメールアカウントからデータを取得して変換することもできます。
DMARCレポートはメールで届くので、後者の使い方をする方が手間がなさそうです。
インストール
今回は下記の環境でdmarc-report-converterを使用します。
OS:AlmaLinux 9.4
Webサーバ:Apache 2.4
Webサーバ上で結果を確認したいのでApacheを用意していますが、htmlファイルを設置するだけなのでApache側に特別変わった設定は必要ありません。
githubからdmarc-report-converterをダウンロードして任意の場所に配置します。
今回は/optに配置しました。
# cd /opt
# wget https://github.com/tierpod/dmarc-report-converter/releases/download/v0.8.1/dmarc-report-converter_v0.8.1-20240617_x86_64.tar.gz
# tar xvzf dmarc-report-converter_v0.8.1-20240617_x86_64.tar.gz
設定ファイルのサンプルをコピーして書き換えます。
※変更部分のみ記載
# cd dmarc-report-converter
# cp -a config.dist.yaml config.yaml
# vi config.yaml
--------------------------------------------------
input:
delete: no
dir: "/opt/dmarc-report-converter/data"

output:
# output file
# should be: string, golang template string or "stdout"
file: "/opt/dmarc-report-converter/output/{{ .ID }}.html"
--------------------------------------------------
# mkdir data
# mkdir output
これで/opt/dmarc-report-converter/dataに置かれたファイルを読み取って、/opt/dmarc-report-converter/outputに変換後のファイルが出力されます。
さっそくdataにDMARCレポートのサンプルを設置して変換をかけてみます。
サンプルとしてsender1.comからのレポート1件、sender2.comからのレポート2件という想定でxmlファイルを3つ作成してdataに設置しました。
変換はconfigを指定してdmarc-report-converterを実行するだけです。
dmarc-report-converterを実行
# /opt/dmarc-report-converter/dmarc-report-converter --config /opt/dmarc-report-converter/config.yaml
[INFO] files: found 3 input files in /opt/dmarc-report-converter/data
[INFO] merge: 1 report(s), grouped by key 'sender1.com!postmaster@sender1.com!example.com'
[INFO] merge: 2 report(s), grouped by key 'sender2.com!postmaster@sender2.com!example.com'
[INFO] output: write to file /opt/dmarc-report-converter/output/2024-11-01-example.com/postmaster@sender1.com-1234567890.html
[INFO] output: write to file /opt/dmarc-report-converter/output/2024-11-01-example.com/postmaster@sender2.com-0987654321.html
変換を実行するとレポートの送信元ごとに分けてhtmlファイルが生成されます。
また、同じ送信元からのレポートが複数あった場合は自動的に1つにまとめられます。
上記では
- /opt/dmarc-report-converter/output/2024-11-01-example.com/postmaster@sender1.com-1234567890.html
- /opt/dmarc-report-converter/output/2024-11-01-example.com/postmaster@sender2.com-0987654321.html
この2つが生成されています。
これらのhtmlファイルをDLするなり、Webサーバからアクセスできる場所に設置するなりすれば結果を確認することができます。
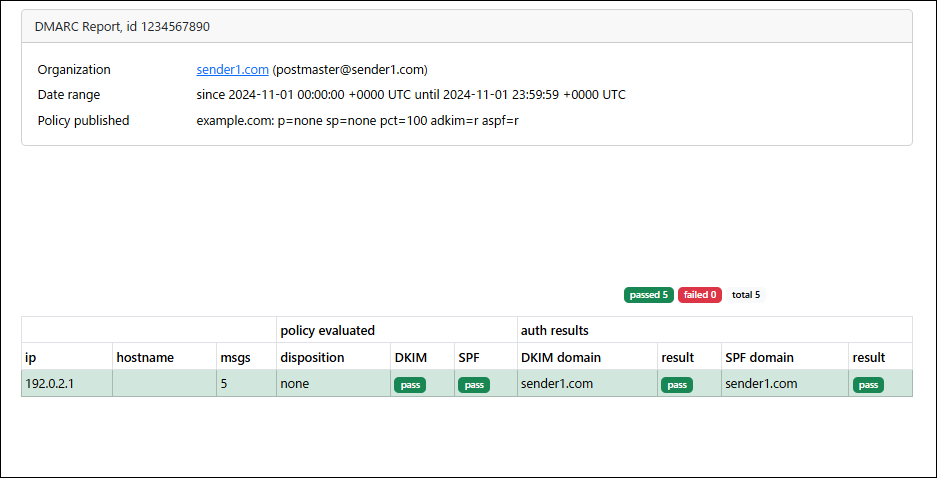
sender1からのレポート(2024年11月1日のレポート)

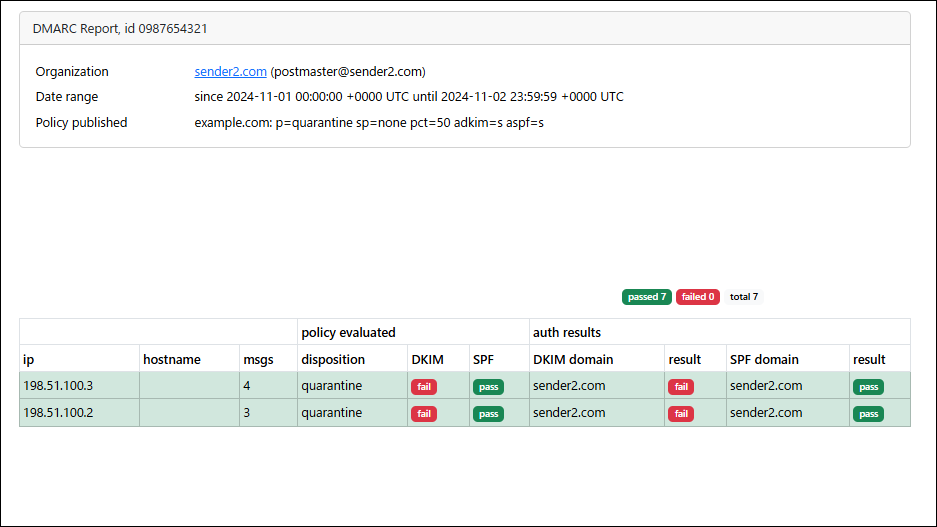
sender2からのレポート(2024年11月1日~2024年11月2日のレポート2件がまとめられている)

「ip」が送信元のIPアドレス、右に続く項目がそこから送信されたメールの判定結果などです。
心当たりのないipが載っていたら、なりすましメールが送信されている可能性があります。
また、正規の送信元から送信されたメールの判定結果がfailになっているようなら、メールサーバやDNSの設定の見直しが必要です。
ちなみに、「hostname」には「ip」の逆引き結果が入りますが、サンプルなのでチェック機能をオフにしています。
逆引きのチェックを行う場合は、configを下記のように設定します。
# perform reverse lookups?
lookup_addr: yes
出力を1つにまとめる
ところで、レポートの送信元ごとに出力ファイルを分けてくれるのは便利なところもあると思いますが、1つのhtmlファイルに出力された方が確認が楽な気がしました。
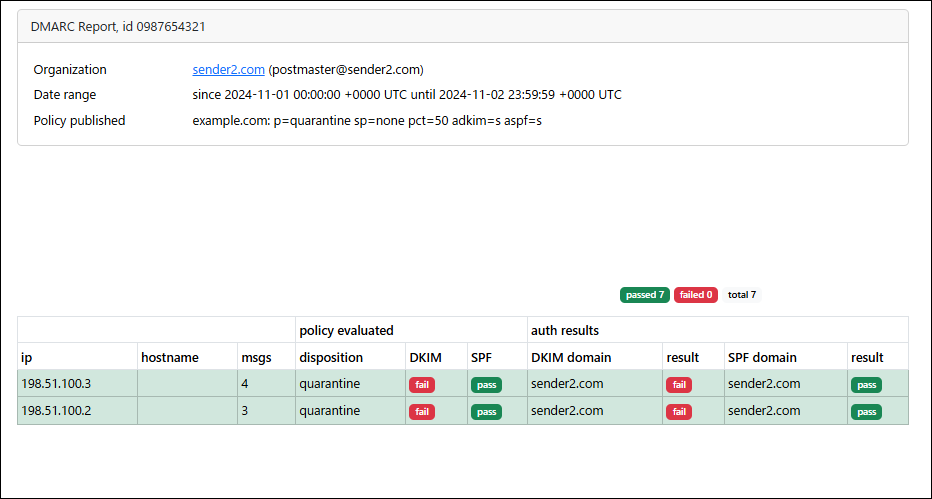
そこで、下記のように出力先を単一のファイルに固定してみましたが、結果としては最後に処理された分のレポートだけのhtmlファイルになってしまいました。
# vi config.yaml
--------------------------------------------------
file: "/opt/dmarc-report-converter/output/dmarc-report.html"
--------------------------------------------------
※出力先を単一ファイルに固定

dmarc-report-converterを実行
# /opt/dmarc-report-converter/dmarc-report-converter --config /opt/dmarc-report-converter/config.yaml
[INFO] files: found 3 input files in /opt/dmarc-report-converter/data
[INFO] merge: 1 report(s), grouped by key 'sender1.com!postmaster@sender1.com!example.com'
[INFO] merge: 2 report(s), grouped by key 'sender2.com!postmaster@sender2.com!example.com'
[INFO] output: write to file /opt/dmarc-report-converter/output/dmarc-report.html
[INFO] output: write to file /opt/dmarc-report-converter/output/dmarc-report.html
単一ファイルに出力させた結果(sender2のレポートのみになっている)

なにかいい方法はないかといくつか試してみたところ、下記のようにすることで全てのレポートを単一のHTMLファイルに出力できました。
# vi config.yaml
--------------------------------------------------
file: "stdout"
--------------------------------------------------
※標準出力に出力

dmarc-report-converterを実行(結果出力をファイルにリダイレクト)
# /opt/dmarc-report-converter/dmarc-report-converter --config /opt/dmarc-report-converter/config.yaml > dmarc-report.html
[INFO] files: found 3 input files in /opt/dmarc-report-converter/data
[INFO] merge: 1 report(s), grouped by key 'sender1.com!postmaster@sender1.com!example.com'
[INFO] merge: 2 report(s), grouped by key 'sender2.com!postmaster@sender2.com!example.com'
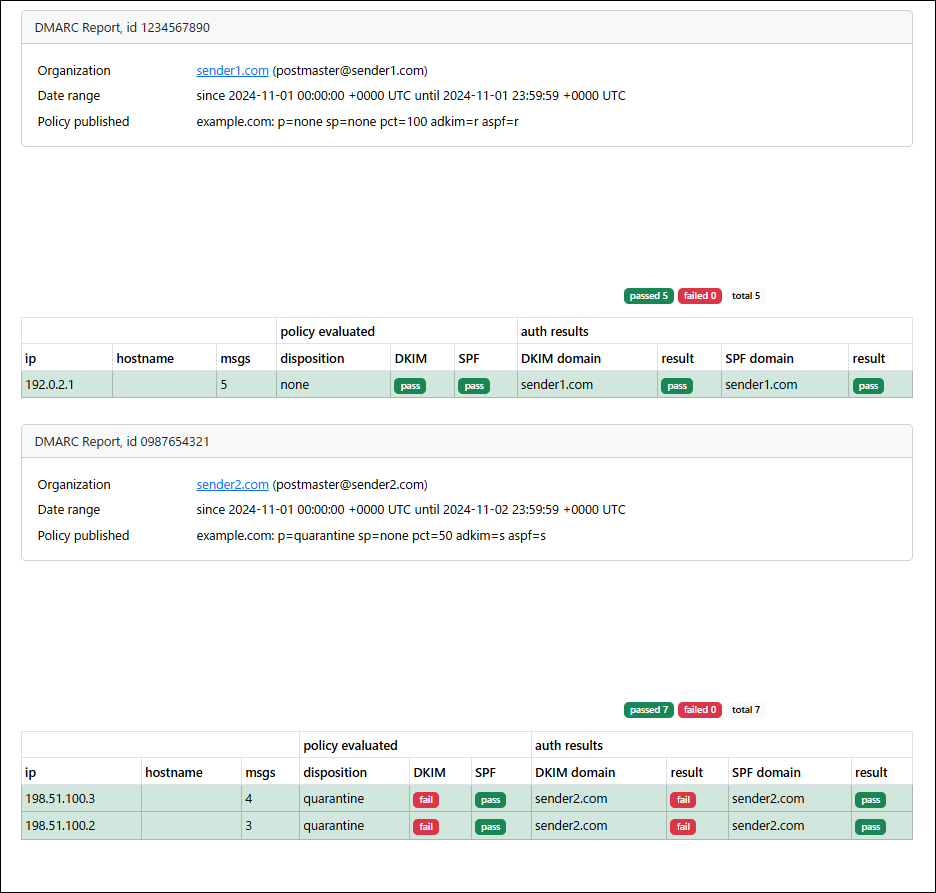
dmarc-report.html(sender1のレポートとsender2のレポートが1つのhtmlにまとまっている)

これなら出力先を固定してすべての結果を確認できるので、Webサーバ上のどこか、例えば「https://サーバIP/dmarc-report.html」を定期的に確認するだけにできそうです。
IMAP設定
IMAPの設定をすると、IMAPサーバからレポートを取得して変換することができます。
動作としては、まずIMAPサーバからレポートを取得し、dirで指定したディレクトリに保存した後に変換を実行する、という形になるようです。
IMAPの設定は下記のようにします。
# vi config.yaml
--------------------------------------------------
input:
delete: no
dir: "/opt/dmarc-report-converter/data"
imap:
server: "mail.example.com:993"
username: "dmarc@example.com"
password: "password"
mailbox: "inbox"
# enable debug messages for imap package?
# debug: no
# delete emails from server after fetch?
delete: no
# connection security should be: tls (default), starttls, plaintext
security: "tls"
--------------------------------------------------
これで「dmarc@example.com」に届くレポートを自動的に集計できるようになります。
定期レポート作成
デフォルトだと変換に使用したデータは消えずに残りますが、週次・月次などのレポートを作成したい場合は古いデータを削除する必要があります。
一定期間ごとに定期レポートを作成したい場合は下記のように設定します。
# vi config.yaml
--------------------------------------------------
input:
delete: yes # 変換済みファイルを削除する
dir: "/opt/dmarc-report-converter/data"
imap:
server: "mail.example.com:993"
username: "dmarc@example.com"
password: "password"
mailbox: "inbox"
# enable debug messages for imap package?
# debug: no
# delete emails from server after fetch?
delete: yes # 受信済みメールを削除する
# connection security should be: tls (default), starttls, plaintext
security: "tls"
--------------------------------------------------

cronで実行させる
# crontab -e
--------------------------------------------------
0 7 * * mon /opt/dmarc-report-converter/dmarc-report-converter --config /opt/dmarc-report-converter/config.yaml > /var/www/html/dmarc-report.html
--------------------------------------------------
上記の設定例では、毎週月曜日の7時までにdmarc@example.com宛てに到着したDMARCレポートが変換されて/var/www/html/dmarc-report.htmlに出力されます。
これなら週ごとに「https://サーバIP/dmarc-report.html」にアクセスするだけでDMARCレポートの確認ができます。
日次のレポートにしたい場合は毎日、月次のレポートにしたい場合は、毎月1日などに実行されるようにスケジュールを設定するだけです。
まとめ
DMARCレポートの可視化ツールはいろいろありますが、dmarc-report-converterは導入がとても簡単なのが良いところだと思います。
その分機能も最低限という感じなので、たとえば有料のサービス型ツールなどには当然劣ると思いますが、個人的にはこれで十分じゃないかなと思います。
DMARCを設定するなら、DMARCレポートはきちんと受け取って、こういった簡単なものでいいので確認するようにするべきでしょう。


![群馬の法人ITサポートサービス Wide Net[ワイドネット] 群馬の法人ITサポートサービス Wide Net[ワイドネット]](https://www.nedia.ne.jp/wp-content/themes/nedia/images/bnr_bt_widenet02.png)


![群馬の法人ITサポートサービス Wide Net[ワイドネット] 群馬の法人ITサポートサービス Wide Net[ワイドネット]](https://www.nedia.ne.jp/wp-content/themes/nedia/images/bnr_bt_widenet03.png)


